Various types of night photography to do in Valencia
The term "night photo tour" is very wide.
We can take the same photographs at night as during the day, but the results will be completely different since our main ingredient, "light," changes.
That wonderful Mediterranean light is replaced at night by artificial lights with different tones and dominant colors.

1.- Urban night photography with or without tripod
Personally, I like to work without a tripod at night (street photo) . The city of Valencia is well lit, and we can intelligently use those lights and reflections to achieve blur-free photos.
It's certainly ideal to have a bright lens for our camera, but remember that we can also raise the ISO, lean on a certain spot, or even take artistic photos with a blurry touch.
Let's remember that photography is an art and not everything has to be perfect, but everything has to have an intention and have a certain charisma.

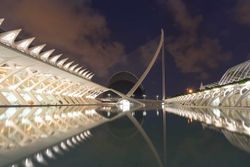
2.- Architectural night photography in Valencia
When we take architectural photographs at the City of Sciences at night, it's advisable to use a tripod, but it's not mandatory.
My personal opinion is that we lose a lot of intuition and magic when we have to use a tripod.
Personally, I don't use it until it's completely dark, since I like to work with high ISOs or a wide-open aperture during the golden hour or blue hour.
I know it might go against the technical quality of the photo, but... why would we want a technically flawless photo if it doesn't have magic?

3.- Photo tour of night photography in Albufera lake
One of the night photo tours I offer is in the Albufera of Valencia. This tour is geared more toward travel photographers who come to Valencia looking to capture beautiful landscape and sunset photos with nuances in the lighting that aren't found elsewhere.
All photographers know that no two places in the world have the same lighting; that's also part of the magic of photography.
This tour is ideal for working with a tripod, filters, etc.
This tour includes transportation. Traveling by car is the ideal option for staying in remote locations when the light fades, when the tourists disappear, leaving us photographers with our cameras and tripods.

Below I'm detailing some technical information about long-exposure photography, which I imagine you're already familiar with. It's a long text that includes a lot of information that you can find in many other places.
I sincerely believe that the learning you need as photographers who have been taking photos for years isn't technical, but rather artistic, conceptual learning.
Forget about technique to embrace art, but in the meantime, here's some technical information. 😉
Equipment for long exposure photography
The basic equipment
Your two best friends, besides a camera with BULB mode (long exposure mode), for night photography will be your tripod and a cable release or a remote shutter release. As for the former, we have to realize that the amount of light is reduced. This implies that we need stability. I recommend a tripod with a certain weight and to which you can attach a counterweight to eliminate or minimize any possibility of movement.
Your two best friends will be the tripod and a cable or remote shutter release.
Also when shooting straight on, pressing the shutter can cause vibrations. To minimize this, in addition to using the option of raising the mirror (if using an SLR) you can use a cable release. Infrared remote triggers sometimes have problems with bulb mode and only allow controlled exposures up to 30 seconds, so you should consult the manual of your infrared shutter release. This never happens with the cable. One click to shoot, lock the button and wait for the set time. Another click and you're done.
It is desirable that the cable is of the intervalometer type (with LCD display), with a timer to control the time. When the programmed time is reached, the second click will be automatic and the intervalometer button will release the camera shutter. You can get by with a simple one without screen or other options and control the exposure time with your watch or your cell phone.
In addition to this, once you advance in night photography you will find the following items useful:
A headlamp: one of those that are placed on the head. Something very necessary when walking at night. This way we will see where we are stepping. Recommended those that also have a red light. The reason is that you can leave the light on while talking to your companions.
Hiking boots: recommended to step well and get into certain places, especially when we are in the field.
Flashes, flashlights and gels: According to taste and depending on the type of lighting we do. Some night photography of landscapes do not usually have artificial lighting, but in the case of wanting to illuminate nearby objects it is surely necessary to use some of these elements.
Rechargeable batteries: Many, many and well charged. It is not unusual to be in the middle of nowhere and run out of batteries. Also remember that with the cold weather, especially in winter, batteries last less time.
Within the basic equipment, in addition to the above items and our camera, we must take into account some mobile applications (there are many) that are essential to schedule our outings and work on night photography. From those that offer us information about the sunrise and its position, the phases of the moon or those that help us to calculate the hyperfocal.
When we are going to do night photography, a recommendation is that we never go alone.
Although it is not part of the equipment, if we are going to do night photography, a recommendation is to never go alone. Especially if it is in the countryside (also in the city, to avoid, in that case, possible theft). Keep in mind that in the middle of the countryside there is usually little or no mobile coverage and if something happens to you it is always better to minimize the possibilities and have a companion who can help you or alert the emergency services.
How to focus your camera at night ?
Modern DSLR cameras allow you to focus automatically in the dark with precision depending on the model and aperture of the lens you are working with. In older cameras, this was practically unthinkable.
However, the great disadvantage of autofocus is that it is not possible to work with infinity focus.
Infinity focus is essential not only for landscape photography where you want to have the whole scene sharp, but it is also essential for focusing in night photography.
Manual focus is essential for a multitude of disciplines, even those you would never believe. Want to know what they are? Take a look at this article.
Infinity focus was undoubtedly a blessing for those who had been working with manual focus for years.
However, it is not impossible to get a good shot of the stars with autofocus either.
10 tips to do in night photography
1. For focusing in night photography switch to manual focus.
Try to work with manual focus whenever possible.
However, if the lighting conditions and your working area allow you to do so, you can also achieve good results using autofocus. However, when you are working with night photography using autofocus and you are having doubts about the quality of your results because they may not be sharp, the best thing to do is to take care of yourself and switch directly to manual focus.
Manual focus lenses will be more comfortable working with manual focus during these types of shoots. They are specifically designed to work in manual mode, and offer precise focus ring movements, which will allow you to focus for night photography with ease.
2. Use infinity focus
Depending on the subject of the photograph, the scene in front of your camera may be beyond the focus range of the lens and the "infinity" distance. In this case, setting the lens to infinity will allow anything beyond a certain distance to be in focus in the shot. Not all lenses have stops at the infinity mark, so finding the true infinity point is problematic.
3. Practice during the day
Another trick for those who don't have Irix lenses with the "click to infinity" feature is to focus your camera on a distant object during the day using the autofocus on your equipment. Then switch the camera to manual focus and use a piece of tape to keep the lens focus from moving. A pre-focused infinity setting will give you more versatility and better results during a night outing.
4. To focus in night photography keep in mind the hyperfocal distance
In this article on the hyperfocal distance, we can deduce that it is the minimum distance at which it is possible to focus - given a diaphragm and a focal length - so that all the shots appear completely sharp: from the subject on which you have focused to infinity. In other words, it is the focus distance from which we obtain the greatest depth of field.
On many older lenses, and increasingly on newer lenses such as Irix lenses, we find hyperfocal markings on the barrel. Basically these marks allow you to set the equipment values so that at a given aperture, you establish at what distance the objects in the composition will be in focus. Without even looking at the viewfinder, you will be able to set the focus correctly.
5. If you have it, use Live View + Zoom
More and more cameras are including this feature, especially useful for focusing in night photography.
It is a drop-down screen on which the shot will be displayed. But this type of screen goes one step further, as it allows you to zoom in on the scene to find the areas of the image that were not correctly focused. In fact, there is an option that allows you to focus directly with Live View, ensuring that parts of the scene will be completely sharp.
That is, even if you are working in the dark, you can zoom in on your screen and manually focus precisely on the part of the image you want. This makes it easier to take pictures of the stars and the Milky Way.
6. To focus in night photography take advantage of Focus Peaking
Focus Peaking is common on cameras with Live View. And it is also common on mirrorless cameras.
Basically, Focus Peaking is a manual focus assist that highlights in the camera's electronic viewfinder or screen the focused areas of the image across the sensor. Using this function, you can identify the well-focused areas of the image you have just taken.
This feature is really useful when working with manual focus lenses. Because, instead of relying on your intuition or what you can see on your LCD screen, you will be able to determine the depth of field of your images in a matter of seconds.
7. Choose autofocus for bright objects
If there is a high-contrast area in the image, it will usually be near a bright object. If so, you can aim your camera's autofocus on that area, and then when moving the camera or changing the autofocus point, check to see if the autofocus stays the same.
Make sure your camera is set for single autofocus only and not continuous focus. If you want to know more about the types of focus that exist and when to use each of them, check out this article.
If the autofocus locks in that area, hold down the shutter halfway or use the autofocus lock, frame and take the picture.
8. To focus in night photography, shoot at the moon.
Is the moon visible in the sky? Guess what? Chances are the moon is past the infinity focus distance of your lens. Point your lens at the moon, focus on auto and lock that focus.
If the moon is not visible, you can repeat this process with a bright star or planet, depending on how advanced and sensitive your camera's autofocus is, you will achieve greater or lesser accuracy.
9. Help yourself with external lighting
If you are photographing objects far away from you, such as stars, these two tricks can help. The first is based on the use of a flashlight, use the light it produces to illuminate the scene, so the focusing system will have enough light and contrast to be able to function normally.
The second trick is based on the use of a head flashlight, place it at the distance you are trying to achieve focus.
Focus on the light produced by these external lighting accessories, fix the focus point and then remove the light before taking the picture. In this way you will achieve focus in night photography easily.
10. To focus for night photography use a laser pointer.
As with the previous two lighting accessories, the laser pointer can reflect off an object.
The laser has the advantage of providing a more concentrated light and is therefore less intrusive than a flashlight beam. The laser pointer is brighter and can help to obtain an accurate focus at a farther distance.